Difference between revisions of "Sacred 2:Gelminy the Adventure Seeker"
Jump to navigation
Jump to search
(Initial commit) |
|||
| (2 intermediate revisions by 2 users not shown) | |||
| Line 29: | Line 29: | ||
{{S2frame|[[Image:GelminyAdventureSeeker_Gelminy1Dialog.jpg]]|left}}<br clear="both" /> | {{S2frame|[[Image:GelminyAdventureSeeker_Gelminy1Dialog.jpg]]|left}}<br clear="both" /> | ||
| − | Head | + | Head east into the desert, and you should quickly find the Stone Guard carrying the scroll. Simply kill it and take the scroll. |
{{S2frame|[[Image:GelminyAdventureSeeker_ScrollMap.jpg|375px]][[Image:GelminyAdventureSeeker_ScrollTabMap.jpg|375px]]|left]]}}<br clear="both" /> | {{S2frame|[[Image:GelminyAdventureSeeker_ScrollMap.jpg|375px]][[Image:GelminyAdventureSeeker_ScrollTabMap.jpg|375px]]|left]]}}<br clear="both" /> | ||
{{S2frame|[[Image:GelminyAdventureSeeker_ScrollCamera.jpg|750px]]|left}}<br clear="both" /> | {{S2frame|[[Image:GelminyAdventureSeeker_ScrollCamera.jpg|750px]]|left}}<br clear="both" /> | ||
| Line 57: | Line 57: | ||
</div> | </div> | ||
[[Category:Sacred 2 Quest|{{PAGENAME}}]] | [[Category:Sacred 2 Quest|{{PAGENAME}}]] | ||
| + | [[Category:Sacred 2 Chain Quest Part|{{PAGENAME}}]] | ||
| + | [[Category:Sacred 2 Bengaresh Desert Quest|{{PAGENAME}}]] | ||
Latest revision as of 00:16, 23 December 2011
|
| ||||||||||


|
Quick Walkthrough
|
| |||||||||

Detailed Walkthrough
In Turbak on the coast in the southwest portion of the Bengaresh Desert, you will meet an adventurer name Gelminy. She needs to find the amulet of the legendary Elf King Brurag El Leigh, and, of course, needs your help.
|
| ||
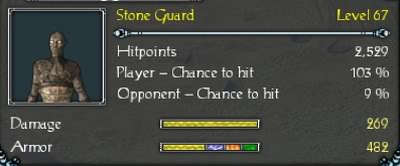
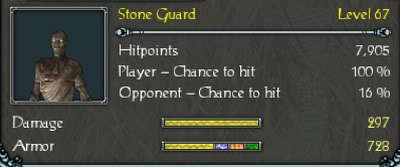
Head east into the desert, and you should quickly find the Stone Guard carrying the scroll. Simply kill it and take the scroll.
|
| ||
  |
||
|
| ||
 |
||
Talk to Gelminy and this quest is complete.
|
| ||
 |
||
Quest Enemies
Stone Guard
|
|
Damage Types: Weakest Against: Region: Bengaresh Desert | ||||||||||||||||||


|
|
Damage Types: Weakest Against: Region: Bengaresh Desert | ||||||||||||||||||
Hirelings and Escorts
- Gelminy - Hireling. Immortal. Tries to fight.
Logbook Entry
| |||||||||
