Difference between revisions of "Sacred 2:And the Second..."
(New page: {{subst:Quest}}) |
(Added info for quest And the Second...) |
||
| Line 8: | Line 8: | ||
|WIDTH="20%" VALIGN="TOP"|__TOC__ | |WIDTH="20%" VALIGN="TOP"|__TOC__ | ||
|WIDTH="50%" VALIGN="TOP"| | |WIDTH="50%" VALIGN="TOP"| | ||
| − | * '''Quest Objective:''' | + | * '''Quest Objective:''' Track down Barthus' gang |
| − | * '''Quest Difficulty:''' | + | * '''Quest Difficulty:''' |
| − | * '''Quest Giver:''' | + | * '''Quest Giver:''' [[Sacred 2:Gareth|Gareth]] |
| − | * '''Location(s):''' | + | * '''Location(s):''' [[Sacred 2:Thylysium|Thylysium]] |
| − | * '''Prerequisite Quest:''' | + | * '''Prerequisite Quest:''' [[Sacred 2:Occulus Mechanicus|Occulus Mechanicus]] |
| − | * '''Next Quest:''' | + | * '''Next Quest:''' [[Sacred 2: Barthus|Barthus]] |
| − | * '''Reward:''' | + | * '''Reward:''' |
| − | |WIDTH="20%" VALIGN="TOP"| | + | |WIDTH="20%" VALIGN="TOP"|[http://www.sacredwiki.org/images/Sacred_2/quests/DM%20Blue%20Quests/And%20The%20Second/sacred2AndTheSecondm.jpg http://www.sacredwiki.org/images/Sacred_2/quests/DM%20Blue%20Quests/And%20The%20Second/th_sacred2AndTheSecondm.jpg] |
<br /> | <br /> | ||
| − | + | [http://www.sacredwiki.org/images/Sacred_2/quests/DM%20Blue%20Quests/And%20The%20Second/sacred2AndTheSecond.jpg http://www.sacredwiki.org/images/Sacred_2/quests/DM%20Blue%20Quests/And%20The%20Second/th_sacred2AndTheSecond.jpg] | |
|} | |} | ||
== Quick Walkthrough == | == Quick Walkthrough == | ||
| − | + | * Talk to Gareth (twice) | |
| + | * Head East out of Thylysium and talk to the Dragon Mage Adept | ||
| + | * Pick up the Ashes of the Dragon Mage | ||
| + | * Travel to the gorge near [[Sacred 2:Garghadok's Destiny|Garghadok's Destiny]] | ||
| + | * Defeat the Dragon Mage's soul (Dragon Boss) | ||
| + | * Travel to Bluestonbury and use the Portal there | ||
| + | == Detailed Walkthrough == | ||
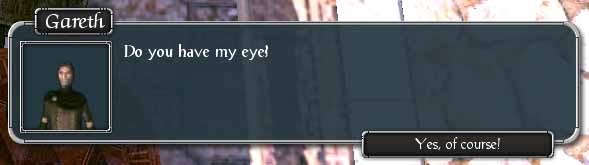
| + | Talk to Gareth and give him the eye, then talk to him again. Apparently the bandits have gone to ground somewhere near Bluestonbury.<br> | ||
| + | [http://www.sacredwiki.org/images/Sacred_2/quests/DM%20Blue%20Quests/And%20The%20Second/sacred2AndTheSeconda.jpg http://www.sacredwiki.org/images/Sacred_2/quests/DM%20Blue%20Quests/And%20The%20Second/th_sacred2AndTheSeconda.jpg] [http://www.sacredwiki.org/images/Sacred_2/quests/DM%20Blue%20Quests/And%20The%20Second/sacred2AndTheSecondb.jpg http://www.sacredwiki.org/images/Sacred_2/quests/DM%20Blue%20Quests/And%20The%20Second/th_sacred2AndTheSecondb.jpg]<br> | ||
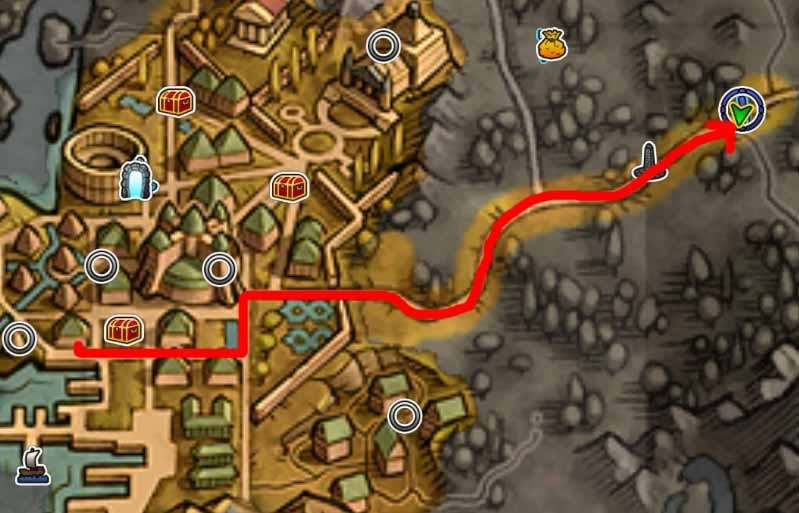
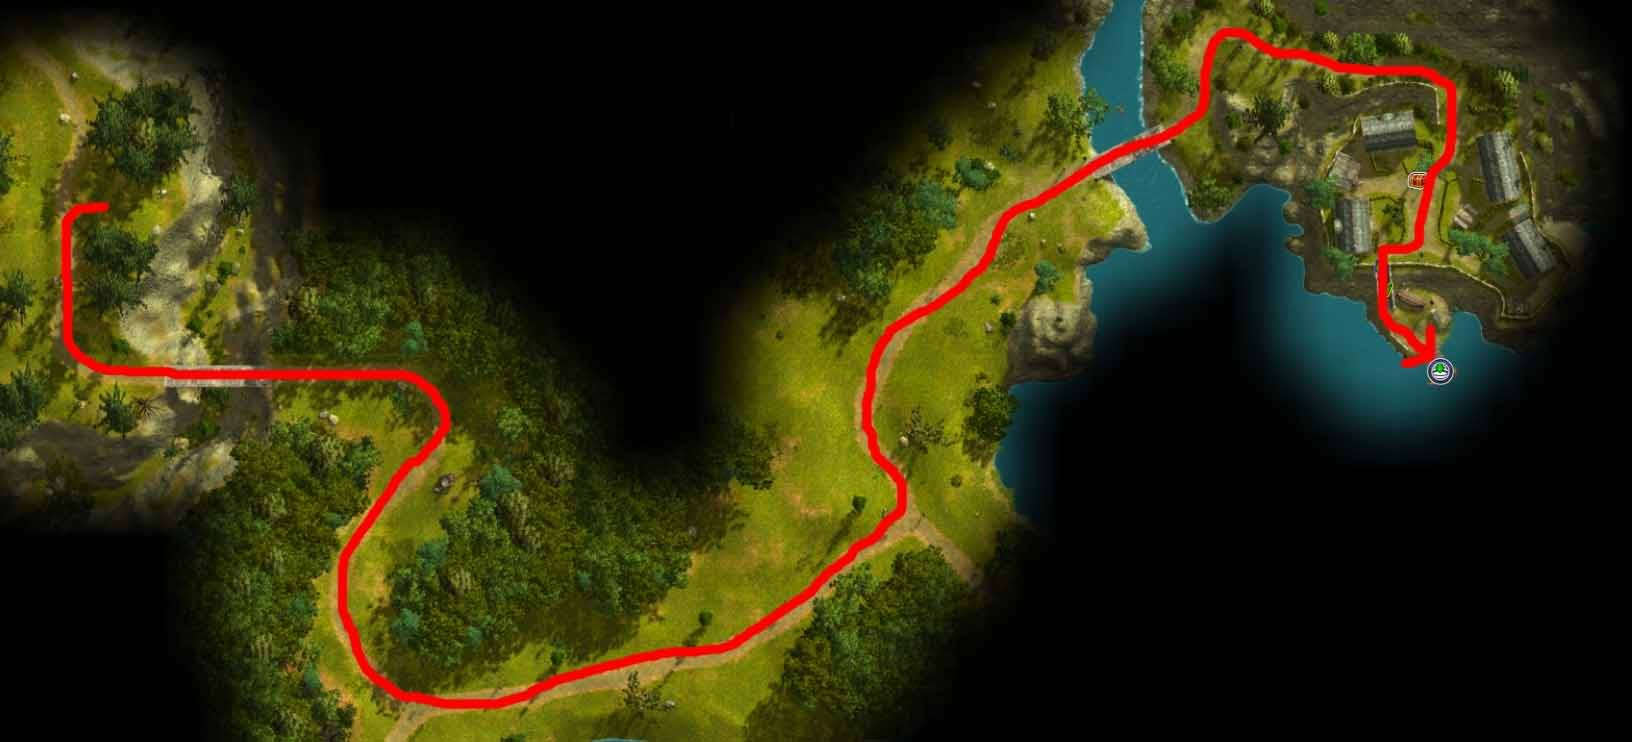
| + | Head East out of Thylysium and follow the main road East until you reach the Resurrection Monument. Just a bit further East along the road from here you will find a Dragon Mage Adept lying on the ground near a T-Energy pipe.<br> | ||
| + | [http://www.sacredwiki.org/images/Sacred_2/quests/DM%20Blue%20Quests/And%20The%20Second/sacred2AndTheSecondwt1.jpg http://www.sacredwiki.org/images/Sacred_2/quests/DM%20Blue%20Quests/And%20The%20Second/th_sacred2AndTheSecondwt1.jpg]<br> | ||
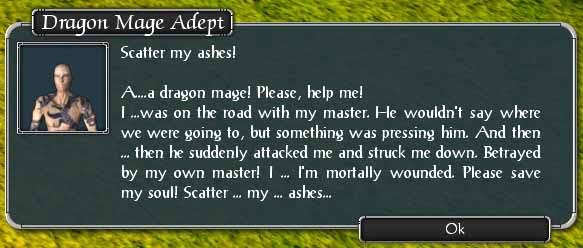
| + | Talk to him and he will tell you he was betrayed by his Master and wants you to save his soul by scattering his ashes.<br> | ||
| + | [http://www.sacredwiki.org/images/Sacred_2/quests/DM%20Blue%20Quests/And%20The%20Second/sacred2AndTheSecondc.jpg http://www.sacredwiki.org/images/Sacred_2/quests/DM%20Blue%20Quests/And%20The%20Second/th_sacred2AndTheSecondc.jpg]<br> | ||
| + | Pick up the Ashes of the Dragon Mage and continue East along the main road until you reach a bridge over a river. Cross over the bridge and turn left (North) onto a dirt road shortly after. Follow this road Northeast to a junction where you should turn left (West) – the signpost points to Bluestonbury.<br> | ||
| + | Follow this road North over another river. At the next junction continue North, but at the junction after that you need to turn left (West). After you cross over another bridge, follow the road as it turns North, but just before it begins to curve West again head East off the track to the edge of the gorge.<br> | ||
| + | [http://www.sacredwiki.org/images/Sacred_2/quests/DM%20Blue%20Quests/And%20The%20Second/sacred2AndTheSecondwt2.jpg http://www.sacredwiki.org/images/Sacred_2/quests/DM%20Blue%20Quests/And%20The%20Second/th_sacred2AndTheSecondwt2.jpg] [http://www.sacredwiki.org/images/Sacred_2/quests/DM%20Blue%20Quests/And%20The%20Second/sacred2AndTheSecondd.jpg http://www.sacredwiki.org/images/Sacred_2/quests/DM%20Blue%20Quests/And%20The%20Second/th_sacred2AndTheSecondd.jpg]<br><br> | ||
| + | '''!!CAUTION!!'''<br> | ||
| + | <br> | ||
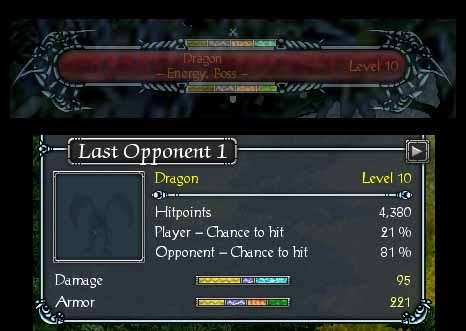
| + | Scattering the mage’s ashes spawns a Dragon Boss – don’t be fooled by its size (see the stats below for an idea of how nasty the level 10 version is). It effectively uses the two Combat Arts [[Sacred 2:Dragon Berserk|Dragon Berserk]] and [[Sacred 2:Dragon Form|Dragon Form]]; in the Dragon Berserk form it will fight at melee range and will leech some life with each hit, and will also use a fiery breath attack, in the Dragon Form form it will fight from a distance using magic/ice missile attacks and will also use the Fire Breath ability to set a large area of the ground on fire.<br> | ||
| + | [http://www.sacredwiki.org/images/Sacred_2/quests/DM%20Blue%20Quests/And%20The%20Second/sacred2AndTheSecondwt3.jpg http://www.sacredwiki.org/images/Sacred_2/quests/DM%20Blue%20Quests/And%20The%20Second/th_sacred2AndTheSecondwt3.jpg]<br> | ||
| + | Your best bet is to use an ice weapon, since this is the only damage type the dragon doesn’t defend against. Defence against fire should be your priority, but magic and ice defence won’t hurt. [[Sacred 2:Runes of Protection|Runes of Protection]] is probably the most helpful buff in this fight, since it boosts resistance and gives you a chance to stun the target. [[Sacred 2:Maelstrom|Maelstrom]] and [[Sacred 2:Mind Strike|Mind Strike]] can also be useful for slowing the dragon (breathing space!) and reducing its attack/defence values. [[Sacred 2:Mind Strike|Mind Strike]] in particular can help limit its use of Combat Arts. You may also find [[Sacred 2: Magic Barrier|Magic Barrier]] useful for the defensive approach, and [[Sacred 2:Dragon Berserk|Dragon Berserk]] useful for a more offensive approach.<br> | ||
| + | <br><br> | ||
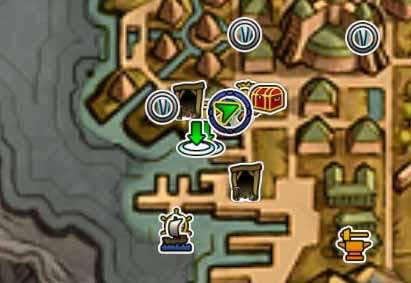
| + | Once the dragon is dead head South down the road and back over the bridge to the East. Continue along the road until you reach the junction, this time continuing on (East) in the direction of Bluestonbury – time to finally track that group of thieves down. | ||
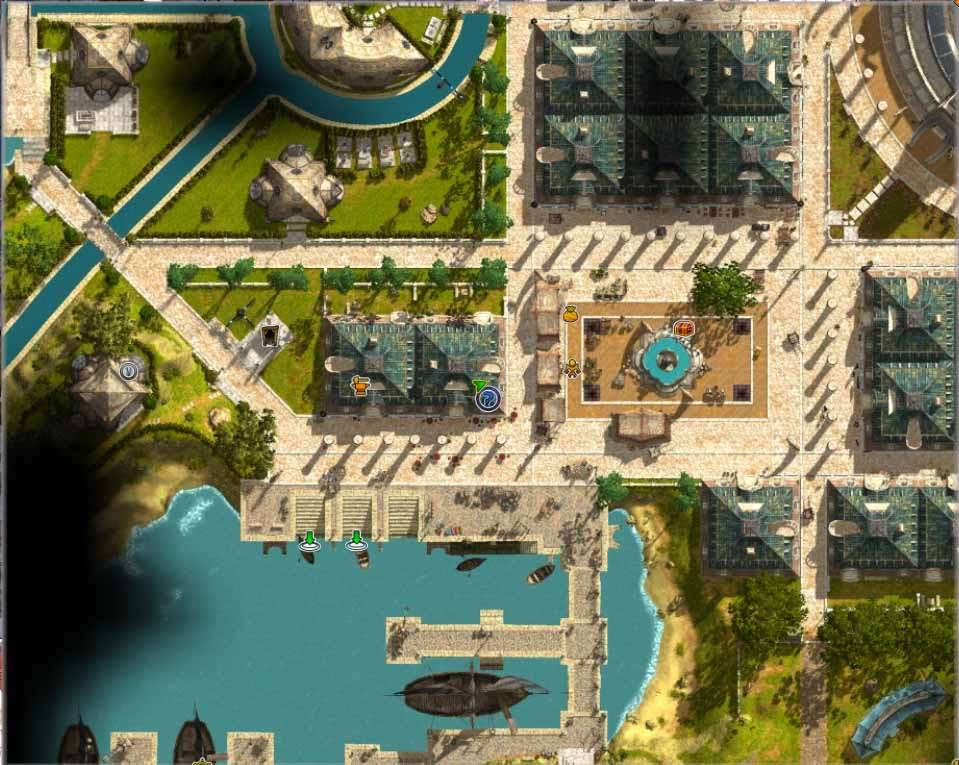
| + | At the next junction turn North and follow the track as it curves around to the East and over a river. Follow the track up the hill into Bluestonbury and head South past the personal chest and down the steps to the harbour.<br> | ||
| + | [http://www.sacredwiki.org/images/Sacred_2/quests/DM%20Blue%20Quests/And%20The%20Second/sacred2AndTheSecondwt4.jpg http://www.sacredwiki.org/images/Sacred_2/quests/DM%20Blue%20Quests/And%20The%20Second/th_sacred2AndTheSecondwt4.jpg]<br> | ||
| + | As soon as you walk close to the boat at the end of the pier you will be teleported to the area where the thieves are hiding and the quest will be complete.<br> | ||
| + | <br> | ||
| + | You need to head up the hill and talk to Barthus to begin the next part of the quest chain, [[Sacred 2:Barthus|Barthus]]. | ||
| − | |||
| − | |||
| Line 32: | Line 57: | ||
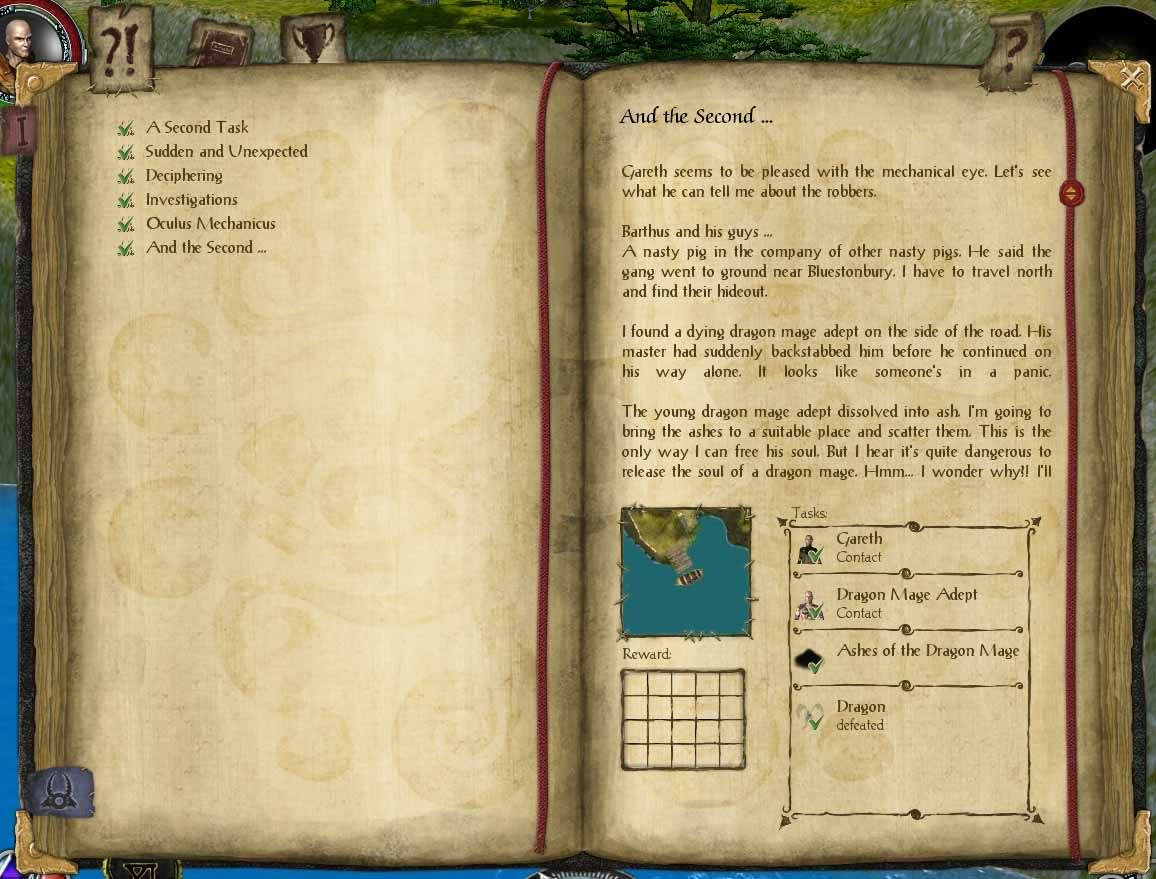
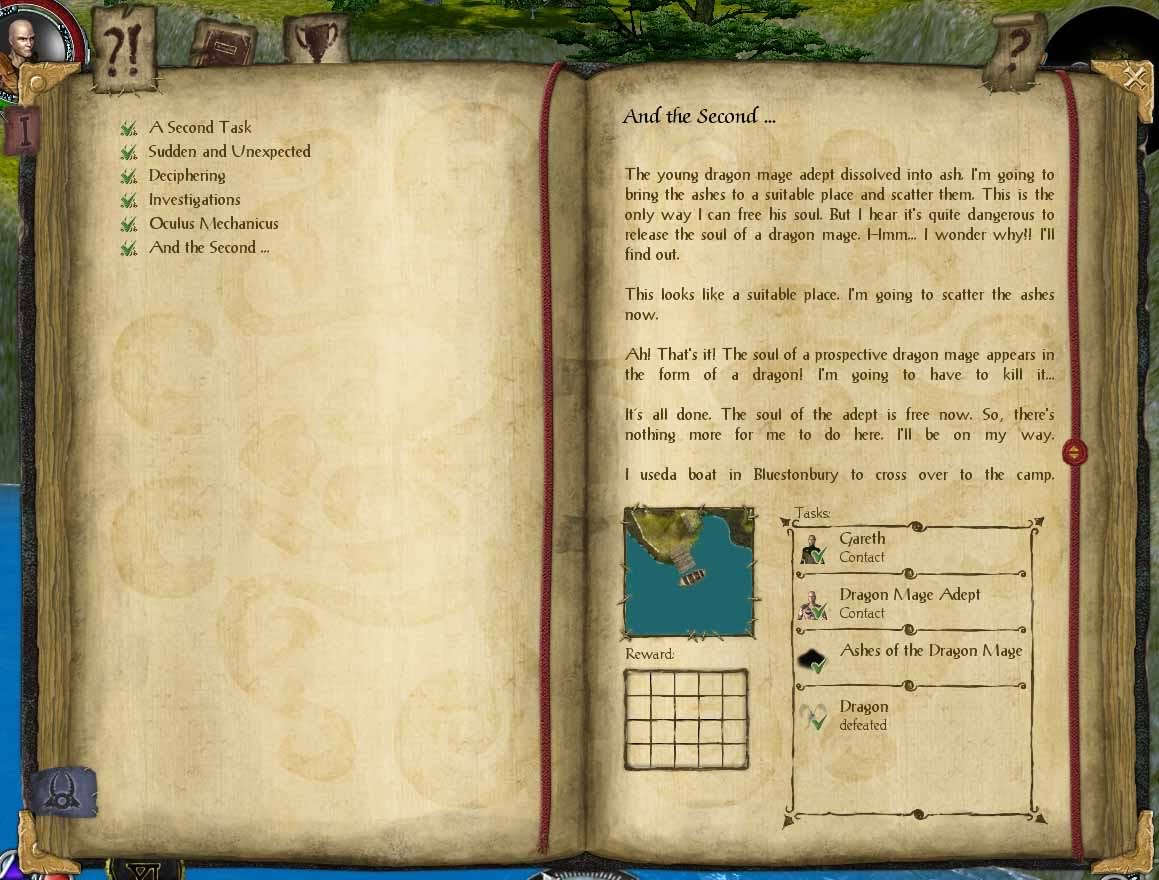
== Logbook Entry == | == Logbook Entry == | ||
| − | + | [http://www.sacredwiki.org/images/Sacred_2/quests/DM%20Blue%20Quests/And%20The%20Second/S2LogAndTheSeconda.jpg http://www.sacredwiki.org/images/Sacred_2/quests/DM%20Blue%20Quests/And%20The%20Second/th_S2LogAndTheSeconda.jpg] [http://www.sacredwiki.org/images/Sacred_2/quests/DM%20Blue%20Quests/And%20The%20Second/S2LogAndTheSecondb.jpg http://www.sacredwiki.org/images/Sacred_2/quests/DM%20Blue%20Quests/And%20The%20Second/th_S2LogAndTheSecondb.jpg] | |
== Notes == | == Notes == | ||
| − | + | ||
</div> | </div> | ||
| − | + | ||
| − | |||
| − | |||
| − | |||
| − | |||
[[Category:Sacred 2 Class Quest]] | [[Category:Sacred 2 Class Quest]] | ||
[[Category:Sacred 2 Quest]] | [[Category:Sacred 2 Quest]] | ||
Revision as of 21:06, 25 October 2009
|
|
Quick Walkthrough
- Talk to Gareth (twice)
- Head East out of Thylysium and talk to the Dragon Mage Adept
- Pick up the Ashes of the Dragon Mage
- Travel to the gorge near Garghadok's Destiny
- Defeat the Dragon Mage's soul (Dragon Boss)
- Travel to Bluestonbury and use the Portal there
Detailed Walkthrough
Talk to Gareth and give him the eye, then talk to him again. Apparently the bandits have gone to ground somewhere near Bluestonbury.

Head East out of Thylysium and follow the main road East until you reach the Resurrection Monument. Just a bit further East along the road from here you will find a Dragon Mage Adept lying on the ground near a T-Energy pipe.
Talk to him and he will tell you he was betrayed by his Master and wants you to save his soul by scattering his ashes.
Pick up the Ashes of the Dragon Mage and continue East along the main road until you reach a bridge over a river. Cross over the bridge and turn left (North) onto a dirt road shortly after. Follow this road Northeast to a junction where you should turn left (West) – the signpost points to Bluestonbury.
Follow this road North over another river. At the next junction continue North, but at the junction after that you need to turn left (West). After you cross over another bridge, follow the road as it turns North, but just before it begins to curve West again head East off the track to the edge of the gorge.


!!CAUTION!!
Scattering the mage’s ashes spawns a Dragon Boss – don’t be fooled by its size (see the stats below for an idea of how nasty the level 10 version is). It effectively uses the two Combat Arts Dragon Berserk and Dragon Form; in the Dragon Berserk form it will fight at melee range and will leech some life with each hit, and will also use a fiery breath attack, in the Dragon Form form it will fight from a distance using magic/ice missile attacks and will also use the Fire Breath ability to set a large area of the ground on fire.
Your best bet is to use an ice weapon, since this is the only damage type the dragon doesn’t defend against. Defence against fire should be your priority, but magic and ice defence won’t hurt. Runes of Protection is probably the most helpful buff in this fight, since it boosts resistance and gives you a chance to stun the target. Maelstrom and Mind Strike can also be useful for slowing the dragon (breathing space!) and reducing its attack/defence values. Mind Strike in particular can help limit its use of Combat Arts. You may also find Magic Barrier useful for the defensive approach, and Dragon Berserk useful for a more offensive approach.
Once the dragon is dead head South down the road and back over the bridge to the East. Continue along the road until you reach the junction, this time continuing on (East) in the direction of Bluestonbury – time to finally track that group of thieves down.
At the next junction turn North and follow the track as it curves around to the East and over a river. Follow the track up the hill into Bluestonbury and head South past the personal chest and down the steps to the harbour.
As soon as you walk close to the boat at the end of the pier you will be teleported to the area where the thieves are hiding and the quest will be complete.
You need to head up the hill and talk to Barthus to begin the next part of the quest chain, Barthus.
Logbook Entry