Difference between revisions of "Sacred 2:Cat and Mouse"
(New page: {{subst:Quest}}) |
(replaced pics with dialogue templates) |
||
| (10 intermediate revisions by 3 users not shown) | |||
| Line 1: | Line 1: | ||
| − | |||
| − | |||
| − | |||
<div class="plainlinks"> | <div class="plainlinks"> | ||
{|WIDTH="100%" | {|WIDTH="100%" | ||
|WIDTH="15%" VALIGN="TOP"|__TOC__ | |WIDTH="15%" VALIGN="TOP"|__TOC__ | ||
|WIDTH="35%" VALIGN="TOP"| | |WIDTH="35%" VALIGN="TOP"| | ||
| − | * '''Quest Objective:''' | + | * '''Quest Objective:''' Return a truant to school |
| − | * '''Quest Difficulty:''' | + | * '''Quest Difficulty:''' 1 star |
| − | * '''Quest Giver:''' | + | * '''Quest Giver:''' [[Sacred 2:Alexander|Alexander]] |
| − | * '''Location(s):''' | + | * '''Location(s):''' [[Sacred 2:Artamark|Artamark]] northeast of [[Sacred 2:Dragonmaw Pass|Dragonmaw Pass]] |
| − | * '''Prerequisite Quest:''' | + | * '''Prerequisite Quest:''' None |
| − | * '''Next Quest:''' | + | * '''Next Quest:''' None |
| − | * '''Reward:''' | + | * '''Reward:''' [[Sacred 2:Experience|Experience]] |
| − | |WIDTH="50%" VALIGN="TOP"| | + | |WIDTH="50%" VALIGN="TOP"| |
| − | + | {{S2frame|[[Image:CatAndMouse_AlexanderMap.jpg|250px]][[Image:CatAndMouse_AlexanderTabMap.jpg|250px]]|right|'''[[Sacred 2:Map of Ancaria|View the Ancaria Interactive Map]]'''}} | |
| − | {{S2frame|[[Image: | ||
|} | |} | ||
{|WIDTH="100%" | {|WIDTH="100%" | ||
|WIDTH="60%" VALIGN="TOP"| | |WIDTH="60%" VALIGN="TOP"| | ||
== Quick Walkthrough == | == Quick Walkthrough == | ||
| − | + | * Talk to Alexander | |
| − | * | + | * Go the cave to find his cat [[Sacred 2:Oscar|Oscar]] and be fend off the bandit ambush |
| − | * | + | * Take Alexander and his cat to the school in [[Sacred 2:Griffinborough|Griffinborough]] |
| − | * | + | |WIDTH="40%" VALIGN="TOP"|{{S2frame|[[Image:CatAndMouse_Alexander1Camera.jpg|500px]]}} |
| − | |WIDTH="40%" VALIGN="TOP"|{{S2frame|[[Image: | ||
|} | |} | ||
== Detailed Walkthrough == | == Detailed Walkthrough == | ||
| − | + | You will find Alexander standing on the side of the road near Dragonmaw Pass, heading towards Griffinborough, near a road that takes off to the south. He will explain to you that his cat is in cave nearby and asks for your help in retrieving it. | |
| − | + | {{S2 Dialogue|NPC NAME=Alexander|PORTRAIT FILE NAME=Dialog106.png|DIALOGUE=Please go into the cave and find my cat!<br><br>My tomcat Oscar ran into that cave. I don't dare to go and look for him on my own. Can you help me?}} | |
| + | <br clear="both" /> | ||
| + | The cave is to the south and not far. | ||
| + | {{S2frame|[[Image:CatAndMouse_CaveMap.jpg|250px]][[Image:CatAndMouse_CaveTabMap.jpg|250px]]|left]]}} | ||
| + | <br clear="both" /> | ||
| + | {{S2frame|[[Image:CatAndMouse_CaveCamera.jpg|400px]]|left}} | ||
| + | <br clear="both" /> | ||
| − | + | Inside the cave, you will find Alexander's cat and a bandit ambush. Talk to the [[Sacred 2:Bandit|Bandit]], and you will find out that Alexander led you into a trap. | |
| + | {{S2frame|[[Image:CatAndMouse_BanditCamera.jpg|400px]]|left}} | ||
| + | <br clear="both" /> | ||
| + | {{S2 Dialogue|NPC NAME=Bandit|PORTRAIT FILE NAME=dialog138.png|DIALOGUE=Well done, lad. If you lure more victims into traps you might become a proper bandit one day.}} | ||
| + | <br clear="both" /> | ||
| − | {{S2frame|[[Image: | + | Defeat the bandits and talk to Alexander again. He tells you does not want to go back to school, so that is where you must take him (and the cat, too). |
| + | {{S2frame|[[Image:CatAndMouse_AlexanderCamera2.jpg|400px]]|left}} | ||
| + | <br clear="both" /> | ||
| + | {{S2 Dialogue|NPC NAME=Alexander|PORTRAIT FILE NAME=Dialog106.png|DIALOGUE=I ran away because I never want to go to school again. Homework is the world's worst. These bandits have taken me in. Please don't take me back. I would rather die than go back to school.}} | ||
<br clear="both" /> | <br clear="both" /> | ||
| − | + | The school is located in Griffinborough, just west of the Resurrection Monolith. Talk to the [[Sacred 2:Teacher|Teacher]] to complete the quest. | |
| − | {{S2frame|[[Image: | + | {{S2frame|[[Image:CatAndMouse_TeacherMap.jpg|250px]][[Image:CatAndMouse_TeacherTabMap.jpg|250px]]|left]]}} |
<br clear="both" /> | <br clear="both" /> | ||
| − | + | {{S2frame|[[Image:CatAndMouse_TeacherCamera.jpg|400px]]|left}} | |
| − | |||
| − | {{S2frame|[[Image: | ||
<br clear="both" /> | <br clear="both" /> | ||
| − | + | {{S2 Dialogue|NPC NAME=Teacher|PORTRAIT FILE NAME=dialog120.png|DIALOGUE=I am glad you returned this disobedient good-for-nothing! Come on, Alexander. You have to catch up on a lot of homework.}} | |
| − | |||
| − | |||
| − | |||
| − | |||
| − | |||
| − | |||
| − | |||
| − | {{ | ||
<br clear="both" /> | <br clear="both" /> | ||
== Quest Enemies == | == Quest Enemies == | ||
| − | |||
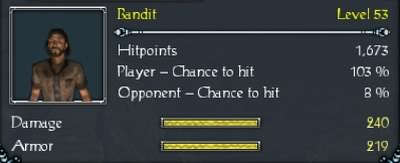
| − | === [[Sacred 2: | + | === [[Sacred 2:Bandit|Bandit]] === |
| − | {{:Sacred 2: | + | {{:Sacred 2:Bandit}} |
== Hirelings and Escorts == | == Hirelings and Escorts == | ||
| − | |||
| − | * [[Sacred 2: | + | * [[Sacred 2:Alexander|Alexander]] - Escort. Immortal. Prior to the ambush, he will simply follows you character. Afterwards, he tries to escape the fight. |
| − | |||
== Logbook Entry == | == Logbook Entry == | ||
| − | |||
{| | {| | ||
| − | |{{S2frame|[[Image: | + | |{{S2frame|[[Image:CatAndMouse_Logbook.jpg|300px]]|left}} |
| − | |||
|} | |} | ||
== Notes == | == Notes == | ||
| − | + | ||
</div> | </div> | ||
| − | |||
[[Category:Sacred 2 Quest|{{PAGENAME}}]] | [[Category:Sacred 2 Quest|{{PAGENAME}}]] | ||
| − | |||
| − | |||
| − | |||
[[Category:Sacred 2 Light Path Quest|{{PAGENAME}}]] | [[Category:Sacred 2 Light Path Quest|{{PAGENAME}}]] | ||
| − | [[Category:Sacred 2 | + | [[Category:Sacred 2 Artamark Quest|{{PAGENAME}}]] |
| − | |||
| − | |||
| − | |||
Latest revision as of 06:40, 30 August 2014
|
| ||||||||||


Quick Walkthrough
|
| |||||||||

Detailed Walkthrough
You will find Alexander standing on the side of the road near Dragonmaw Pass, heading towards Griffinborough, near a road that takes off to the south. He will explain to you that his cat is in cave nearby and asks for your help in retrieving it.


Please go into the cave and find my cat!
My tomcat Oscar ran into that cave. I don't dare to go and look for him on my own. Can you help me?
The cave is to the south and not far.
|
| ||
  |
||
|
| ||
 |
||
Inside the cave, you will find Alexander's cat and a bandit ambush. Talk to the Bandit, and you will find out that Alexander led you into a trap.
|
| ||
 |
||


Well done, lad. If you lure more victims into traps you might become a proper bandit one day.
Defeat the bandits and talk to Alexander again. He tells you does not want to go back to school, so that is where you must take him (and the cat, too).
|
| ||
 |
||
I ran away because I never want to go to school again. Homework is the world's worst. These bandits have taken me in. Please don't take me back. I would rather die than go back to school.
The school is located in Griffinborough, just west of the Resurrection Monolith. Talk to the Teacher to complete the quest.
|
| ||
  |
||
|
| ||
 |
||


I am glad you returned this disobedient good-for-nothing! Come on, Alexander. You have to catch up on a lot of homework.
Quest Enemies
Bandit
|
|
Damage Types: Weakest Against: Quest:Cat and Mouse Quest Location: Black Oaks in Artamark | ||||||||||||||||||


Hirelings and Escorts
- Alexander - Escort. Immortal. Prior to the ambush, he will simply follows you character. Afterwards, he tries to escape the fight.
Logbook Entry
| |||||||||
