Difference between revisions of "Sacred 2:Besieged Temple"
(Created page with "{{subst:Quest}}") |
|||
| Line 6: | Line 6: | ||
|WIDTH="15%" VALIGN="TOP"|__TOC__ | |WIDTH="15%" VALIGN="TOP"|__TOC__ | ||
|WIDTH="35%" VALIGN="TOP"| | |WIDTH="35%" VALIGN="TOP"| | ||
| − | * '''Quest Objective:''' | + | * '''Quest Objective:''' Find out what happened to his novices |
| − | * '''Quest Difficulty:''' | + | * '''Quest Difficulty:''' 2 Stars |
| − | * '''Quest Giver:''' | + | * '''Quest Giver:''' [[Sacred 2:Temple Provost Julius|Temple Provost Julius]] |
| − | * '''Location(s):''' | + | * '''Location(s):''' [[Sacred 2:Artamark|Artamark]], in [[Sacred 2:Grunwald|Grunwald]] |
| − | + | * '''Reward:''' [[Sacred 2:Gold|Gold]] [[Sacred 2:Experience|Experience]] | |
| − | + | |WIDTH="50%" VALIGN="TOP"| | |
| − | * '''Reward:''' | ||
| − | |WIDTH="50%" VALIGN="TOP"| | ||
| − | {{S2frame|[[Image: | + | {{S2frame|[[Image:provostmap.jpg|250px]][[Image:provosttab.jpg|250px]]|right|'''[[Sacred 2:Map of Ancaria|View the Ancaria Interactive Map]]'''}} |
|} | |} | ||
{|WIDTH="100%" | {|WIDTH="100%" | ||
|WIDTH="60%" VALIGN="TOP"| | |WIDTH="60%" VALIGN="TOP"| | ||
== Quick Walkthrough == | == Quick Walkthrough == | ||
| − | + | * Talk to Provost Julius | |
| − | * | + | * Recover '''Hellar's''' and '''Quadling's Rings''' |
| − | * | + | * Talk to Provost |
| − | * | + | * Kill [[Sacred 2:Elemental of Destruction|Elementals of Destruction]] until you collect 4 '''Fire Elemental Essences''' |
| − | |WIDTH="40%" VALIGN="TOP"|{{S2frame|[[Image: | + | * Kill [[Sacred 2:Elemental of Protection|Elementals of Protection]] until you collect 4 '''Earth Elemental Essences''' |
| + | * Return and talk to Provost for reward | ||
| + | |WIDTH="40%" VALIGN="TOP"|{{S2frame|[[Image:provostloc.jpg|500px]]}} | ||
|} | |} | ||
== Detailed Walkthrough == | == Detailed Walkthrough == | ||
| − | + | You'll find Provost Julius at the [[Sacred 2:Temple of the Gods|Temple of the Gods]]. He is in dire need. The temple is under siege and he sent out a couple of novices to get help. But that was a week ago and he hasn't heard from them since. He asks that if you could search for them but he fears the worst. | |
| − | |||
| + | {{S2frame|[[Image:provostchat.gif|430px]]|left}} | ||
| + | <br clear="both" /> | ||
| − | + | You head out and down the path that leads away from the temple. You find the 2 novices not far away but they are already dead. You notice they both wear a ring. You collect both of them, maybe the provost can positively identify his novices with them. You head back to the temple and hand the rings over. As soon as the Provost sees them he knows the awful truth. His novices are dead. | |
| − | {{S2frame|[[Image: | + | {{S2frame|[[Image:provostchat2.gif|430px]]|left}} |
<br clear="both" /> | <br clear="both" /> | ||
| + | He realizes now that sending out any more of his novices for reinforcements is futile. Instead he wants to cast a protective shield over the temple. In order to do that he needs the Essences of the Elementals that are attacking the temple. | ||
| − | |||
| − | |||
| − | + | {{S2frame|[[Image:provostchat3.gif|430px]]|left}} | |
| − | {{S2frame|[[Image: | ||
<br clear="both" /> | <br clear="both" /> | ||
| + | You head path out along the path and kill enough [[Sacred 2:Elemental of Destruction|Elementals of Destruction]] and [[Sacred 2:Elemental of Protection|Elementals of Protection]] to get 4 Essences each of Fire and Earth. Now that you have gathered all that the provost needed, you head back to the temple and give him the Essences. | ||
| − | + | {{S2frame|[[Image:provostchat4.gif|430px]]|left}} | |
| − | + | <br clear="both" /> | |
| − | [[Image: | ||
| − | + | He thanks you and says every Priest of this Temple is in your debt. He's sure they would have died without your assistance. You ask for a blessing and head out back to other adventures. | |
| − | |||
| − | |||
== Quest Enemies == | == Quest Enemies == | ||
| − | + | == [[Sacred 2:Elemental of Destruction|Elemental of Destruction]] == | |
| + | {{:Sacred 2:Elemental of Destruction}} | ||
| − | + | == [[Sacred 2:Elemental of Protection|Elemental of Protection]] == | |
| − | {{:Sacred 2: | + | {{:Sacred 2:Elemental of Protection}} |
| − | == | + | == Logbook Entry == |
| − | |||
| − | |||
| − | |||
| − | |||
| − | |||
| − | |||
| − | |||
{| | {| | ||
| − | |{{S2frame|[[Image: | + | |{{S2frame|[[Image:beseigedtemplelog.jpg|300px]]|left}} |
| − | |||
|} | |} | ||
== Notes == | == Notes == | ||
| − | |||
| + | </div> | ||
| − | |||
| − | |||
| − | |||
[[Category:Sacred 2 Quest|{{PAGENAME}}]] | [[Category:Sacred 2 Quest|{{PAGENAME}}]] | ||
[[Category:Sacred 2 Side Quest|{{PAGENAME}}]] | [[Category:Sacred 2 Side Quest|{{PAGENAME}}]] | ||
| − | [[Category:Sacred 2 | + | [[Category:Sacred 2 Artamark Quest|{{SUBPAGENAME}}]] |
| − | |||
| − | |||
| − | |||
| − | |||
| − | |||
| − | |||
Revision as of 00:22, 8 October 2013
|
| ||||||||||


Quick Walkthrough
|
| |||||||||

Detailed Walkthrough
You'll find Provost Julius at the Temple of the Gods. He is in dire need. The temple is under siege and he sent out a couple of novices to get help. But that was a week ago and he hasn't heard from them since. He asks that if you could search for them but he fears the worst.
|
| ||
 |
||
You head out and down the path that leads away from the temple. You find the 2 novices not far away but they are already dead. You notice they both wear a ring. You collect both of them, maybe the provost can positively identify his novices with them. You head back to the temple and hand the rings over. As soon as the Provost sees them he knows the awful truth. His novices are dead.
|
| ||
 |
||
He realizes now that sending out any more of his novices for reinforcements is futile. Instead he wants to cast a protective shield over the temple. In order to do that he needs the Essences of the Elementals that are attacking the temple.
|
| ||
 |
||
You head path out along the path and kill enough Elementals of Destruction and Elementals of Protection to get 4 Essences each of Fire and Earth. Now that you have gathered all that the provost needed, you head back to the temple and give him the Essences.
|
| ||
 |
||
He thanks you and says every Priest of this Temple is in your debt. He's sure they would have died without your assistance. You ask for a blessing and head out back to other adventures.
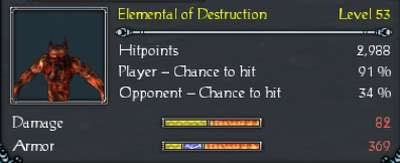
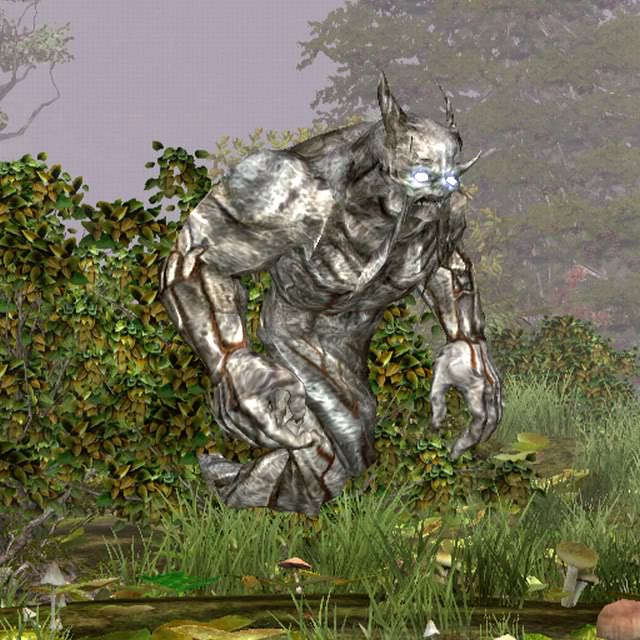
Quest Enemies
Elemental of Destruction
|
|
Damage Types: Weakest Against: Region: Artamark | ||||||||||||||||||


|
|
Damage Types: Weakest Against: Region: Artamark | ||||||||||||||||||

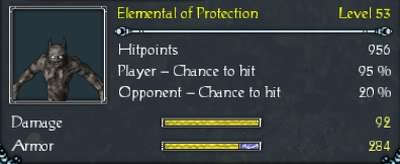
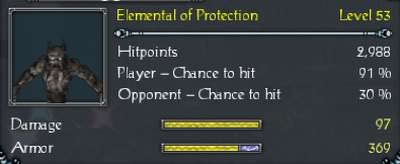
Elemental of Protection
|
|
Damage Types: Weakest Against: Region: Artamark | ||||||||||||||||||

|
|
Damage Types: Weakest Against: Region: Artamark | ||||||||||||||||||
Logbook Entry
| |||||||||
