Difference between revisions of "Sacred 2:Brother-Of-One's-Brother-In-Law"
(New page: {{subst:Quest}}) |
m |
||
| (4 intermediate revisions by one other user not shown) | |||
| Line 1: | Line 1: | ||
| − | |||
| − | |||
| − | |||
<div class="plainlinks"> | <div class="plainlinks"> | ||
{|WIDTH="100%" | {|WIDTH="100%" | ||
|WIDTH="15%" VALIGN="TOP"|__TOC__ | |WIDTH="15%" VALIGN="TOP"|__TOC__ | ||
|WIDTH="35%" VALIGN="TOP"| | |WIDTH="35%" VALIGN="TOP"| | ||
| − | * '''Quest Objective:''' | + | * '''Quest Objective:''' Put an end to the thieves behind all the robberies. |
| − | * '''Quest Difficulty:''' | + | * '''Quest Difficulty:''' 4 Stars |
| − | * '''Quest Giver:''' | + | * '''Quest Giver:''' Talk to [[Sacred 2:Beer Brewer Jasper|Beer Brewer Jasper]] |
| − | * '''Location(s):''' | + | * '''Location(s):''' [[Sacred 2:Artamark|Artamark]], at the [[Sacred 2:Royal Honky-Tonk Tavern|Royal Honky-Tonk Tavern]] |
| − | * '''Prerequisite Quest:''' | + | * '''Prerequisite Quest:''' [[Sacred 2:Hunting Scoundrels|Hunting Scoundrels]] |
| − | * '''Next Quest:''' | + | * '''Next Quest:''' None |
| − | * '''Reward:''' | + | * '''Reward:''' [[Sacred 2:Gold|Gold]] [[Sacred 2:Experience|Experience]] |
| − | |WIDTH="50%" VALIGN="TOP"| | + | |WIDTH="50%" VALIGN="TOP"| |
| − | {{S2frame|[[Image: | + | {{S2frame|[[Image:jaspermap.jpg|250px]][[Image:jaspertab.jpg|250px]]|right|'''[[Sacred 2:Map of Ancaria|View the Ancaria Interactive Map]]'''}} |
|} | |} | ||
{|WIDTH="100%" | {|WIDTH="100%" | ||
|WIDTH="60%" VALIGN="TOP"| | |WIDTH="60%" VALIGN="TOP"| | ||
== Quick Walkthrough == | == Quick Walkthrough == | ||
| − | + | * Talk to Jasper | |
| − | * | + | * Talk to [[Sacred 2:Village Priest|Village Priest]] |
| − | * | + | * Talk to [[Sacred 2:Leifhard|Leifhard]] |
| − | * | + | * Defeat 5 [[Sacred 2:Rogue|Rogues]] |
| − | |WIDTH="40%" VALIGN="TOP"|{{S2frame|[[Image: | + | * Defeat [[Sacred 2:Two-Eye|Two-Eye]] |
| + | * Pick up 3 pieces of stolen loot | ||
| + | * Return to Village Priest | ||
| + | |WIDTH="40%" VALIGN="TOP"|{{S2frame|[[Image:jasperloc.jpg|500px]]}} | ||
|} | |} | ||
== Detailed Walkthrough == | == Detailed Walkthrough == | ||
| − | + | After verifying Jasper's beer supply is safe he suggests you talk to the priest in the next town. He's the brother of Jasper's first wife and he had a robbery at his temple recently. | |
| − | + | {{S2frame|[[Image:jasperchat3.jpg|430px]]|left}} | |
| + | <br clear="both" /> | ||
| − | + | Head east of [[Sacred 2:Griffinborough|Griffinborough]] to the [[Sacred 2:Temple of the Gods|Temple of the Gods]]. | |
| − | {{S2frame|[[Image: | + | {{S2frame|[[Image:villagepriestmap.jpg|250px]][[Image:villagepriesttab.jpg|250px]]|left]]}} |
| + | |||
| + | {{S2frame|[[Image:villagepriestloc.jpg|400px]]|left}} | ||
<br clear="both" /> | <br clear="both" /> | ||
| − | {{S2frame|[[Image: | + | He'll tell you his temple was robbed a few days ago and it looks like the work of professionals.They knew what was valuable and only took those items. He's sure the thieves are sitting on the loot until the whole thing's blown over. He suggests talking to old [[Sacred 2:Leifhard|Leifhard]]. He was a thief in his younger years and still know his way around on the shady side. |
| + | |||
| + | {{S2frame|[[Image:villagepriestchat.jpg|430px]]|left}} | ||
<br clear="both" /> | <br clear="both" /> | ||
| − | + | So you head back to [[Sacred 2:Valeview|Valeview]]. You'll find him next to a burnt out house. | |
| − | {{S2frame|[[Image: | + | |
| + | {{S2frame|[[Image:highbernmap.jpg|250px]][[Image:highberntab.jpg|250px]]|left]]}} | ||
| + | |||
| + | {{S2frame|[[Image:leifhardloc.jpg|400px]]|left}} | ||
<br clear="both" /> | <br clear="both" /> | ||
| + | He assures you he is permanently retired from line of work. Not too many thieves would dare rob temples so the only name he think of is Two-Eye. He tells you where their hide-out is. | ||
| − | + | {{S2frame|[[Image:leifhardchat.jpg|400px]]|left}} | |
| + | <br clear="both" /> | ||
| − | [[Image: | + | Head head back through Griffinborough and to the thieves camp east of town up in the foothills. |
| + | |||
| + | {{S2frame|[[Image:two-eyeloc.jpg|400px]]|left}} | ||
| + | <br clear="both" /> | ||
| + | |||
| + | You find Two-Eye's camp and are immediately attacked by him and his thugs. Once defeated you'll find the stolen temple items. | ||
| + | |||
| + | {{S2frame|[[Image:two-eyeloot.jpg|400px]]|left}} | ||
| + | <br clear="both" /> | ||
| + | |||
| + | A short walk north and you're back at the temple. The Village Priest is overjoyed at the return of the religious objects. He'll reward you for a job well done. | ||
| − | |||
| − | {{S2frame|[[Image: | + | {{S2frame|[[Image:villagepriestchat2.jpg|430px]]|left}} |
<br clear="both" /> | <br clear="both" /> | ||
== Quest Enemies == | == Quest Enemies == | ||
| − | |||
| − | + | == [[Sacred 2:Rogue|Rogue]] == | |
| − | {{:Sacred 2: | + | {{:Sacred 2:Rogue}} |
| − | == | + | == [[Sacred 2:Two-Eye|Two-Eye]] == |
| − | + | {{:Sacred 2:Two-Eye}} | |
| − | |||
| − | |||
== Logbook Entry == | == Logbook Entry == | ||
| − | + | ||
{| | {| | ||
| − | |{{S2frame|[[Image: | + | |{{S2frame|[[Image:brotherinlawlog1.jpg|300px]]|left}} |
| − | |{{S2frame|[[Image: | + | |{{S2frame|[[Image:brotherinlawlog2.jpg|300px]]|left}} |
|} | |} | ||
== Notes == | == Notes == | ||
| − | |||
</div> | </div> | ||
| − | + | ||
[[Category:Sacred 2 Quest|{{PAGENAME}}]] | [[Category:Sacred 2 Quest|{{PAGENAME}}]] | ||
| − | + | [[Category:Sacred 2 Chain Quest Part|{{PAGENAME}}]] | |
| − | [[Category:Sacred 2 Chain Quest | + | [[Category:Sacred 2 Artamark Quest|{{PAGENAME}}]] |
| − | |||
| − | |||
| − | |||
| − | |||
| − | [[Category:Sacred 2 | ||
| − | |||
Latest revision as of 01:40, 8 November 2013
|
| ||||||||||


Quick Walkthrough
|
| |||||||||

Detailed Walkthrough
After verifying Jasper's beer supply is safe he suggests you talk to the priest in the next town. He's the brother of Jasper's first wife and he had a robbery at his temple recently.
|
| ||
 |
||
Head east of Griffinborough to the Temple of the Gods.
|
| ||
  |
||
|
| ||
 |
||
He'll tell you his temple was robbed a few days ago and it looks like the work of professionals.They knew what was valuable and only took those items. He's sure the thieves are sitting on the loot until the whole thing's blown over. He suggests talking to old Leifhard. He was a thief in his younger years and still know his way around on the shady side.
|
| ||
 |
||
So you head back to Valeview. You'll find him next to a burnt out house.
|
| ||
  |
||
|
| ||
 |
||
He assures you he is permanently retired from line of work. Not too many thieves would dare rob temples so the only name he think of is Two-Eye. He tells you where their hide-out is.
|
| ||
 |
||
Head head back through Griffinborough and to the thieves camp east of town up in the foothills.
|
| ||
 |
||
You find Two-Eye's camp and are immediately attacked by him and his thugs. Once defeated you'll find the stolen temple items.
|
| ||
 |
||
A short walk north and you're back at the temple. The Village Priest is overjoyed at the return of the religious objects. He'll reward you for a job well done.
|
| ||
 |
||
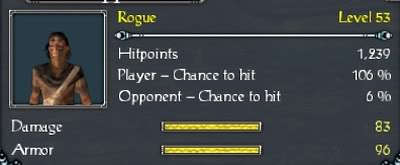
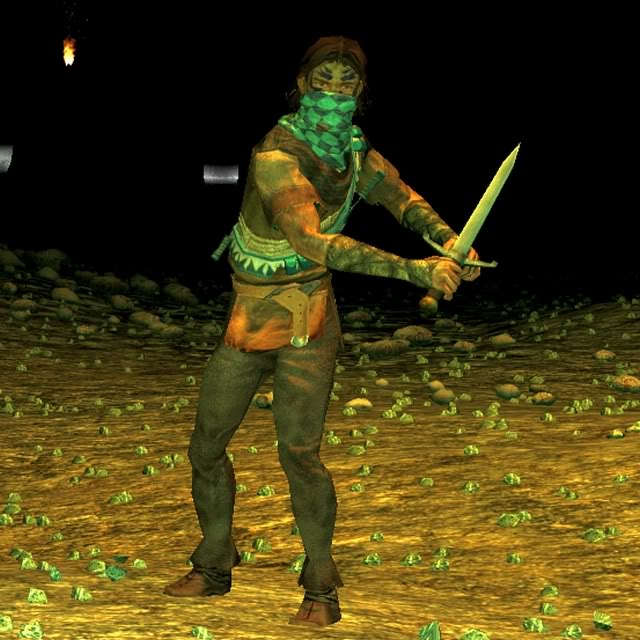
Quest Enemies
Rogue
|
|
Damage Types: Weakest Against: Quest:Greedy Scoundrels Quest Location: Griffinborough in Artamark | ||||||||||||||||||


Two-Eye
|
|
Damage Types: Weakest Against: Quest:Greedy Scoundrels Quest Location: Griffinborough in Artamark | ||||||||||||||||||


Logbook Entry
|
| ||||||||||||||||||

