Difference between revisions of "Sacred 2:Past Mistakes"
(New page: {{subst:Quest}}) |
|||
| (5 intermediate revisions by the same user not shown) | |||
| Line 1: | Line 1: | ||
| − | |||
| − | |||
| − | |||
<div class="plainlinks"> | <div class="plainlinks"> | ||
{|WIDTH="100%" | {|WIDTH="100%" | ||
|WIDTH="15%" VALIGN="TOP"|__TOC__ | |WIDTH="15%" VALIGN="TOP"|__TOC__ | ||
|WIDTH="35%" VALIGN="TOP"| | |WIDTH="35%" VALIGN="TOP"| | ||
| − | * '''Quest Objective:''' | + | * '''Quest Objective:''' Learn the truth of the resurrections |
| − | * '''Quest Difficulty:''' | + | * '''Quest Difficulty:'''No difficulty giver for this quest |
| − | * '''Quest Giver:''' | + | * '''Quest Giver:''' [[Sacred 2:Hudelia|Hudelia]] |
| − | * '''Location(s):''' | + | * '''Location(s):''' [[Sacred 2:Dragon Sea Islands|Dragon Sea Islands]] region, at the [[Sacred 2:Seraphim Tower|Seraphim Tower]] |
| − | * '''Prerequisite Quest:''' | + | * '''Prerequisite Quest:''' [[Sacred 2:Orcish Necromancers|Orcish Necromancers]] |
| − | * '''Next Quest:''' | + | * '''Next Quest:''' [[Sacred 2:Waking the Dead|Waking the Dead]] |
| − | * '''Reward:''' | + | * '''Reward:''' [[Sacred 2:Gold|Gold]] [[Sacred 2:Experience|Experience]] |
| − | |WIDTH="50%" VALIGN="TOP"| | + | * '''Main Quest Page:''' [[Sacred 2:Shadow Warrior Class Chain Quest - Light]] |
| + | |WIDTH="50%" VALIGN="TOP"| | ||
| − | {{S2frame|[[Image: | + | {{S2frame|[[Image:hudeliamap.jpg|250px]][[Image:hudeliatab.jpg|250px]]|right|'''[[Sacred 2:Map of Ancaria|View the Ancaria Interactive Map]]'''}} |
|} | |} | ||
{|WIDTH="100%" | {|WIDTH="100%" | ||
|WIDTH="60%" VALIGN="TOP"| | |WIDTH="60%" VALIGN="TOP"| | ||
== Quick Walkthrough == | == Quick Walkthrough == | ||
| − | + | * Talk to [[Sacred 2:Hudelia|Hudelia]] 4 times | |
| − | * | + | * Teleport into [[Sacred 2:Seraphim Arena|Seraphim Arena]] |
| − | * | + | * Defeat 6 Undead Zombies |
| − | * | + | * Defeat 4 [[Sacred 2:Undead Ogre|Undead Ogres]] |
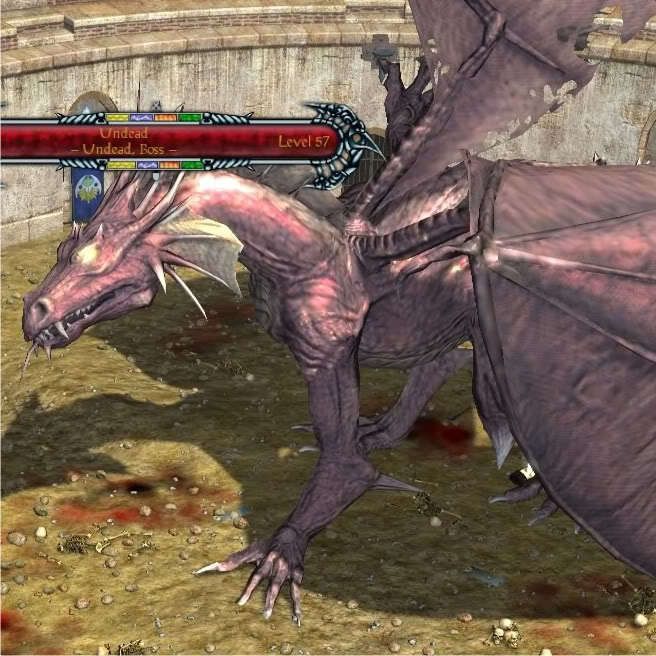
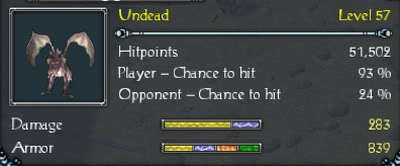
| − | |WIDTH="40%" VALIGN="TOP"|{{S2frame|[[Image: | + | * Defeat [[Sacred 2:Undead Dragon|Undead Dragon]] |
| + | * Teleport out of arena and speak with Hudelia again | ||
| + | |WIDTH="40%" VALIGN="TOP"|{{S2frame|[[Image:hudelialoc.jpg|500px]]}} | ||
|} | |} | ||
== Detailed Walkthrough == | == Detailed Walkthrough == | ||
| − | |||
| − | + | Pull up a chair and get comfortable. Hudelia is going to tell you everything you needed to know about the resurrections. It's a long story but one you've been dying to hear (no pun intended). She begins by telling you how impressed the Seraphim are at your recent exploits, your courage, your heroism, the selflessness shown in your deeds. This has convinced them to choose you in correcting a mistake the Seraphim made a long time ago. Not to worry, she will explain everything. At the beginning of time when the world was new and the creator had just left and placed the world in the care of his of his creations, a war broke out. It spread to all races and folk, the powerful and the weak, the rich and the poor. No one was spared including the Seraphim. | |
| + | |||
| + | They lost so many sisters they feared they could not prevent the world from collapsing. In an act of desperation they sacrificed 3 of their own sisters, and with elven magic they created an artifact capable of bringing the sisters back. The plan worked and they were able to win the war. Afterwards they realized the object was far too powerful to be in the hands of one person. They broke it up into three pieces and gave one piece each to a sister. Over time the bearers of the objects were found and the objects themselves lost to time and myth. Now through your travels and perseverance, the objects are now found and back in the hands of the Seraphim. They can revert the items back into their original form but they can only do it at the hub. | ||
| + | Only it has the necessary magic powerful enough to destroy the artifact forever. Your task will be to bring the artifact to the hub. Now you know how this all came about. Something done in act of desperation, perverted by those who don't respect the power they hold. Before you begin this task, Hudelia asks if you wouldn't mind cleaning up a little mishap that happened down in the vault. Says it's nothing you can't handle. You have to wonder what it is that they don't want to handle? | ||
| − | |||
| − | {{S2frame|[[Image: | + | {{S2frame|[[Image:hudeliachat.jpg|430px]]|left}} |
<br clear="both" /> | <br clear="both" /> | ||
| − | {{S2frame|[[Image: | + | {{S2frame|[[Image:hudeliachat2.jpg|430px]]|left}} |
<br clear="both" /> | <br clear="both" /> | ||
| − | + | ||
| − | {{S2frame|[[Image: | + | {{S2frame|[[Image:hudeliachat3.jpg|430px]]|left}} |
<br clear="both" /> | <br clear="both" /> | ||
| − | + | {{S2frame|[[Image:hudeliachat4.jpg|430px]]|left}} | |
| + | <br clear="both" /> | ||
| + | |||
| + | You teleport over to the [[Sacred 2:Seraphim Arena|Seraphim Arena]] and have to eliminate 6 undead zombies. Well that wasn't bad. Oh there's more...4 Undead Ogres appear...now that's something you don't see everyday! They're a little tougher but you return them to the netherworld quick enough. Huh? there's a round 3? Oh my dear (Wiki censor edit) Holy Lumens !!!! An Undead Dragon !!! Now you're in a battle. This is her 'little' problem? After a knock down drag out fight you vanquish the beast and head back to Hudelia. | ||
| − | [[Image: | + | {{S2frame|[[Image:arena mmap.jpg|250px]][[Image:arena tmap.jpg|250px]]|left]]}} |
| − | + | {{S2frame|[[Image:arenaogre.jpg|400px]]|left}} | |
| + | <br clear="both" /> | ||
| − | {{S2frame|[[Image: | + | {{S2frame|[[Image:arenadragon2.jpg|400px]]|left}} |
<br clear="both" /> | <br clear="both" /> | ||
| − | = | + | {{S2frame|[[Image:arenateleport.jpg|400px]]|left}} |
| − | + | <br clear="both" /> | |
| − | + | She congratulates you on a job well done and explains that their sister Sophia liked to bring back animals from her journeys and looks like they got out of hand. She doesn't mention why they're undead. Better to leave that thought alone. You take the '''Artifact of Resurrection''' and head straight for the [[Sacred 2:Carnach Cave|Carnach Cave]] entrance. | |
| − | |||
| − | = | + | {{S2frame|[[Image:hudeliachat5.jpg|430px]]|left}} |
| − | + | <br clear="both" /> | |
| − | + | == Quest Enemies == | |
| − | + | == [[Sacred 2:Undead Ogre|Undead Ogre]] == | |
| + | {{:Sacred 2:Undead Ogre}} | ||
| + | == [[Sacred 2:Undead Dragon|Undead Dragon]] == | ||
| + | {{:Sacred 2:Undead Dragon}} | ||
== Logbook Entry == | == Logbook Entry == | ||
| − | |||
{| | {| | ||
| − | |{{S2frame|[[Image: | + | |{{S2frame|[[Image:shadowmistakelog.jpg|300px]]|left}} |
| − | |{{S2frame|[[Image: | + | |{{S2frame|[[Image:pastmistakeslog2.jpg|300px]]|left}} |
|} | |} | ||
== Notes == | == Notes == | ||
| − | + | ||
| + | |||
</div> | </div> | ||
| − | + | ||
[[Category:Sacred 2 Quest|{{PAGENAME}}]] | [[Category:Sacred 2 Quest|{{PAGENAME}}]] | ||
| − | + | [[Category:Sacred 2 Chain Quest Part|{{PAGENAME}}]] | |
| − | [[Category:Sacred 2 Chain Quest | ||
[[Category:Sacred 2 Class Quest|{{PAGENAME}}]] | [[Category:Sacred 2 Class Quest|{{PAGENAME}}]] | ||
[[Category:Sacred 2 Light Path Quest|{{PAGENAME}}]] | [[Category:Sacred 2 Light Path Quest|{{PAGENAME}}]] | ||
| − | [[Category:Sacred 2 | + | [[Category:Sacred 2 Artamark Quest|{{PAGENAME}}]] |
| − | [[Category:Sacred 2 | + | [[Category:Sacred 2 The Dragon Sea Islands Quest|{{PAGENAME}}]] |
| − | |||
| − | |||
Latest revision as of 22:38, 3 January 2012
|
| ||||||||||


Quick Walkthrough
|
| |||||||||

Detailed Walkthrough
Pull up a chair and get comfortable. Hudelia is going to tell you everything you needed to know about the resurrections. It's a long story but one you've been dying to hear (no pun intended). She begins by telling you how impressed the Seraphim are at your recent exploits, your courage, your heroism, the selflessness shown in your deeds. This has convinced them to choose you in correcting a mistake the Seraphim made a long time ago. Not to worry, she will explain everything. At the beginning of time when the world was new and the creator had just left and placed the world in the care of his of his creations, a war broke out. It spread to all races and folk, the powerful and the weak, the rich and the poor. No one was spared including the Seraphim.
They lost so many sisters they feared they could not prevent the world from collapsing. In an act of desperation they sacrificed 3 of their own sisters, and with elven magic they created an artifact capable of bringing the sisters back. The plan worked and they were able to win the war. Afterwards they realized the object was far too powerful to be in the hands of one person. They broke it up into three pieces and gave one piece each to a sister. Over time the bearers of the objects were found and the objects themselves lost to time and myth. Now through your travels and perseverance, the objects are now found and back in the hands of the Seraphim. They can revert the items back into their original form but they can only do it at the hub.
Only it has the necessary magic powerful enough to destroy the artifact forever. Your task will be to bring the artifact to the hub. Now you know how this all came about. Something done in act of desperation, perverted by those who don't respect the power they hold. Before you begin this task, Hudelia asks if you wouldn't mind cleaning up a little mishap that happened down in the vault. Says it's nothing you can't handle. You have to wonder what it is that they don't want to handle?
|
| ||
 |
||
|
| ||
 |
||
|
| ||
 |
||
|
| ||
 |
||
You teleport over to the Seraphim Arena and have to eliminate 6 undead zombies. Well that wasn't bad. Oh there's more...4 Undead Ogres appear...now that's something you don't see everyday! They're a little tougher but you return them to the netherworld quick enough. Huh? there's a round 3? Oh my dear (Wiki censor edit) Holy Lumens !!!! An Undead Dragon !!! Now you're in a battle. This is her 'little' problem? After a knock down drag out fight you vanquish the beast and head back to Hudelia.
|
| ||
  |
||
|
| ||
 |
||
|
| ||
 |
||
|
| ||
 |
||
She congratulates you on a job well done and explains that their sister Sophia liked to bring back animals from her journeys and looks like they got out of hand. She doesn't mention why they're undead. Better to leave that thought alone. You take the Artifact of Resurrection and head straight for the Carnach Cave entrance.
|
| ||
 |
||
Quest Enemies
Undead Ogre
|
|
Damage Types: Weakest Against: Quest:Past Mistakes Quest Location: Seraphim Arena in Dragon Sea Islands | ||||||||||||||||||


Undead Dragon
|
|
Damage Done: Weak against: | ||||||||||||||||||
Logbook Entry
|
| ||||||||||||||||||

