Difference between revisions of "Sacred 2:A Long Journey"
| (7 intermediate revisions by 3 users not shown) | |||
| Line 8: | Line 8: | ||
* '''Location(s):''' Town of [[Sacred 2:Clearview|Clearview]] within [[Sacred 2:Tyr Lysia|Tyr Lysia]] | * '''Location(s):''' Town of [[Sacred 2:Clearview|Clearview]] within [[Sacred 2:Tyr Lysia|Tyr Lysia]] | ||
* '''Prerequisite Quest:''' None | * '''Prerequisite Quest:''' None | ||
| − | * '''Next Quest:''' | + | * '''Next Quest:''' [[Sacred 2:Raiders|Raiders]] |
* '''Reward:''' | * '''Reward:''' | ||
| − | |WIDTH="50%" VALIGN="TOP"| | + | |WIDTH="50%" VALIGN="TOP"| |
| − | + | {{S2frame|[[Image:LongJourney_LinaMap.jpg|250px]][[Image:LongJourney_LinaTabMap.jpg|250px]]|right|'''[[Sacred 2:Map of Ancaria|View the Ancaria Interactive Map]]'''}} | |
| − | {{S2frame|[[Image: | ||
|} | |} | ||
{|WIDTH="100%" | {|WIDTH="100%" | ||
| Line 21: | Line 20: | ||
* Deliver the package to [[Sacred 2:Commander Elsurion|Commander Elsurion]] in [[Sacred 2:Artamark|Artamark]] | * Deliver the package to [[Sacred 2:Commander Elsurion|Commander Elsurion]] in [[Sacred 2:Artamark|Artamark]] | ||
| − | |WIDTH="40%" VALIGN="TOP"|{{S2frame|[[Image: | + | |WIDTH="40%" VALIGN="TOP"|{{S2frame|[[Image:LongJourney_LinaCamera.jpg|500px]]}} |
|} | |} | ||
== Detailed Walkthrough == | == Detailed Walkthrough == | ||
| − | You will meet Lina in Clearview. She will ask you to deliver a package to her son who is a soldier. | + | You will meet Lina in Clearview. She is standing just outside the house directly east of the Clearview portal and monolith. |
| + | She will ask you to deliver a package to her son who is a soldier. | ||
| + | |||
| + | {{S2frame|[[Image:LongJourney_DeElficiMap.jpg|250px]][[Image:LongJourney_DeElficiTabMap.jpg|250px]]|left]]}} | ||
| + | <br clear="both" /> | ||
Travel north towards Dragon Maw Pass to the DeElfici trading post. There you will meet Glydial DeElfici, who will give you the package that is to be delivered. | Travel north towards Dragon Maw Pass to the DeElfici trading post. There you will meet Glydial DeElfici, who will give you the package that is to be delivered. | ||
| − | + | {{S2frame|[[Image:LongJourney_DeElficiCamera.jpg|400px]]|left}} | |
| − | + | <br clear="both" /> | |
| − | + | {{S2frame|[[Image:LongJourney_DeElficiDialog.jpg|430px]]|left}} | |
| − | + | <br clear="both" /> | |
| − | + | Travel through the secret tunnel into Artamark. If you have not progressed past this point in the Light Campaign [[Sacred 2:Through the Wall|Through the Wall]], you will need to do that before you can go through this tunnel. Go through [[Sacred 2:Black Oaks|Black Oaks]] towards [[Sacred 2:Wargfels|Wargfels]]. At the first drop site, you will be attacked by brigands. | |
| − | + | {{S2frame|[[Image:LongJourney_BrigandMap.jpg|250px]][[Image:LongJourney_BrigandTabMap.jpg|250px]]|left]]}} | |
| − | |||
| − | |||
| − | |||
| − | {{S2frame|[[Image: | ||
<br clear="both" /> | <br clear="both" /> | ||
| − | + | Defeat the brigands and continue west, and you will meet Commander Elsurion on the road. He thanks you and the quest is completed. | |
| − | {{S2frame|[[Image: | + | {{S2frame|[[Image:LongJourney_ElsurionMap.jpg|250px]][[Image:LongJourney_ElsurionTabMap.jpg|250px]]|left]]}} |
<br clear="both" /> | <br clear="both" /> | ||
| − | + | {{S2frame|[[Image:LongJourney_ElsurionCamera.jpg|400px]]|left}} | |
| − | |||
| − | {{S2frame|[[Image: | ||
<br clear="both" /> | <br clear="both" /> | ||
| − | + | {{S2frame|[[Image:LongJourney_ElsurionDialog.jpg|430px]]|left}} | |
| − | |||
| − | |||
| − | |||
| − | |||
| − | |||
| − | |||
| − | |||
| − | {{S2frame|[[Image: | ||
<br clear="both" /> | <br clear="both" /> | ||
== Quest Enemies == | == Quest Enemies == | ||
| − | |||
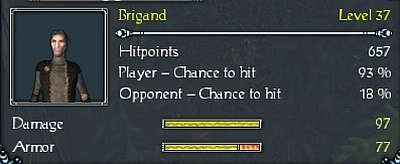
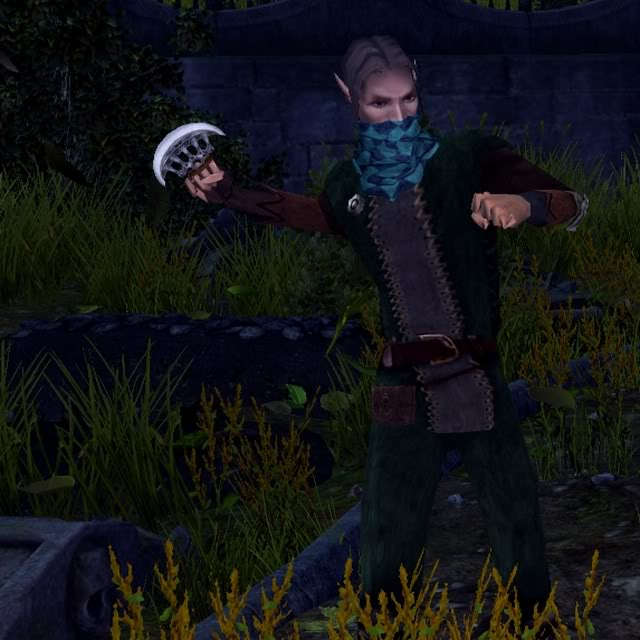
=== [[Sacred 2:Brigand|Brigand]] === | === [[Sacred 2:Brigand|Brigand]] === | ||
{{:Sacred 2:Brigand}} | {{:Sacred 2:Brigand}} | ||
| − | |||
== Logbook Entry == | == Logbook Entry == | ||
| − | |||
{| | {| | ||
| − | |{{S2frame|[[Image: | + | |{{S2frame|[[Image:LongJourney_Logbook2.jpg|300px]]|left}} |
| − | |||
|} | |} | ||
| Line 82: | Line 67: | ||
</div> | </div> | ||
[[Category:Sacred 2 Quest|{{PAGENAME}}]] | [[Category:Sacred 2 Quest|{{PAGENAME}}]] | ||
| − | [[Category:Sacred 2 | + | [[Category:Sacred 2 Chain Quest|{{PAGENAME}}]] |
[[Category:Sacred 2 Light Path Quest|{{PAGENAME}}]] | [[Category:Sacred 2 Light Path Quest|{{PAGENAME}}]] | ||
| + | [[Category:Sacred 2 Tyr Lysia Quest|{{PAGENAME}}]] | ||
Latest revision as of 23:19, 19 December 2011
| |||||||||||


Quick Walkthrough
|
| |||||||||

Detailed Walkthrough
You will meet Lina in Clearview. She is standing just outside the house directly east of the Clearview portal and monolith. She will ask you to deliver a package to her son who is a soldier.
|
| ||
  |
||
Travel north towards Dragon Maw Pass to the DeElfici trading post. There you will meet Glydial DeElfici, who will give you the package that is to be delivered.
|
| ||
 |
||
|
| ||
 |
||
Travel through the secret tunnel into Artamark. If you have not progressed past this point in the Light Campaign Through the Wall, you will need to do that before you can go through this tunnel. Go through Black Oaks towards Wargfels. At the first drop site, you will be attacked by brigands.
|
| ||
  |
||
Defeat the brigands and continue west, and you will meet Commander Elsurion on the road. He thanks you and the quest is completed.
|
| ||
  |
||
|
| ||
 |
||
|
| ||
 |
||
Quest Enemies
Brigand
|
|
Damage Types: Weakest Against: Region: Tyr Lysia | ||||||||||||||||||


|
|
Damage Types: Weakest Against: Region: Tyr Lysia | ||||||||||||||||||


Logbook Entry
| |||||||||
